A few months ago I acquired a vintage silver Rampone soprano saxophone. It had been in someone’s grandmother’s attic, without a case, for who knows how long and was in quite a state of disrepair. Every pad (pretty sure they were all original) and most corks needed replacing, some keys and rods were bent, and the whole thing needed a good polishing. I have some basic repair skills and take care of basic pad, cork, and felt replacement and adjustments on my horns, and have done a full strip down, repad, and polish of a metal clarinet once, but have never undertaken a full restoration of a saxophone before.
The thought to write a post about this process only occurred to me after I started, and even then I didn’t do a very good job of photo documenting it, but here’s what I’ve got:


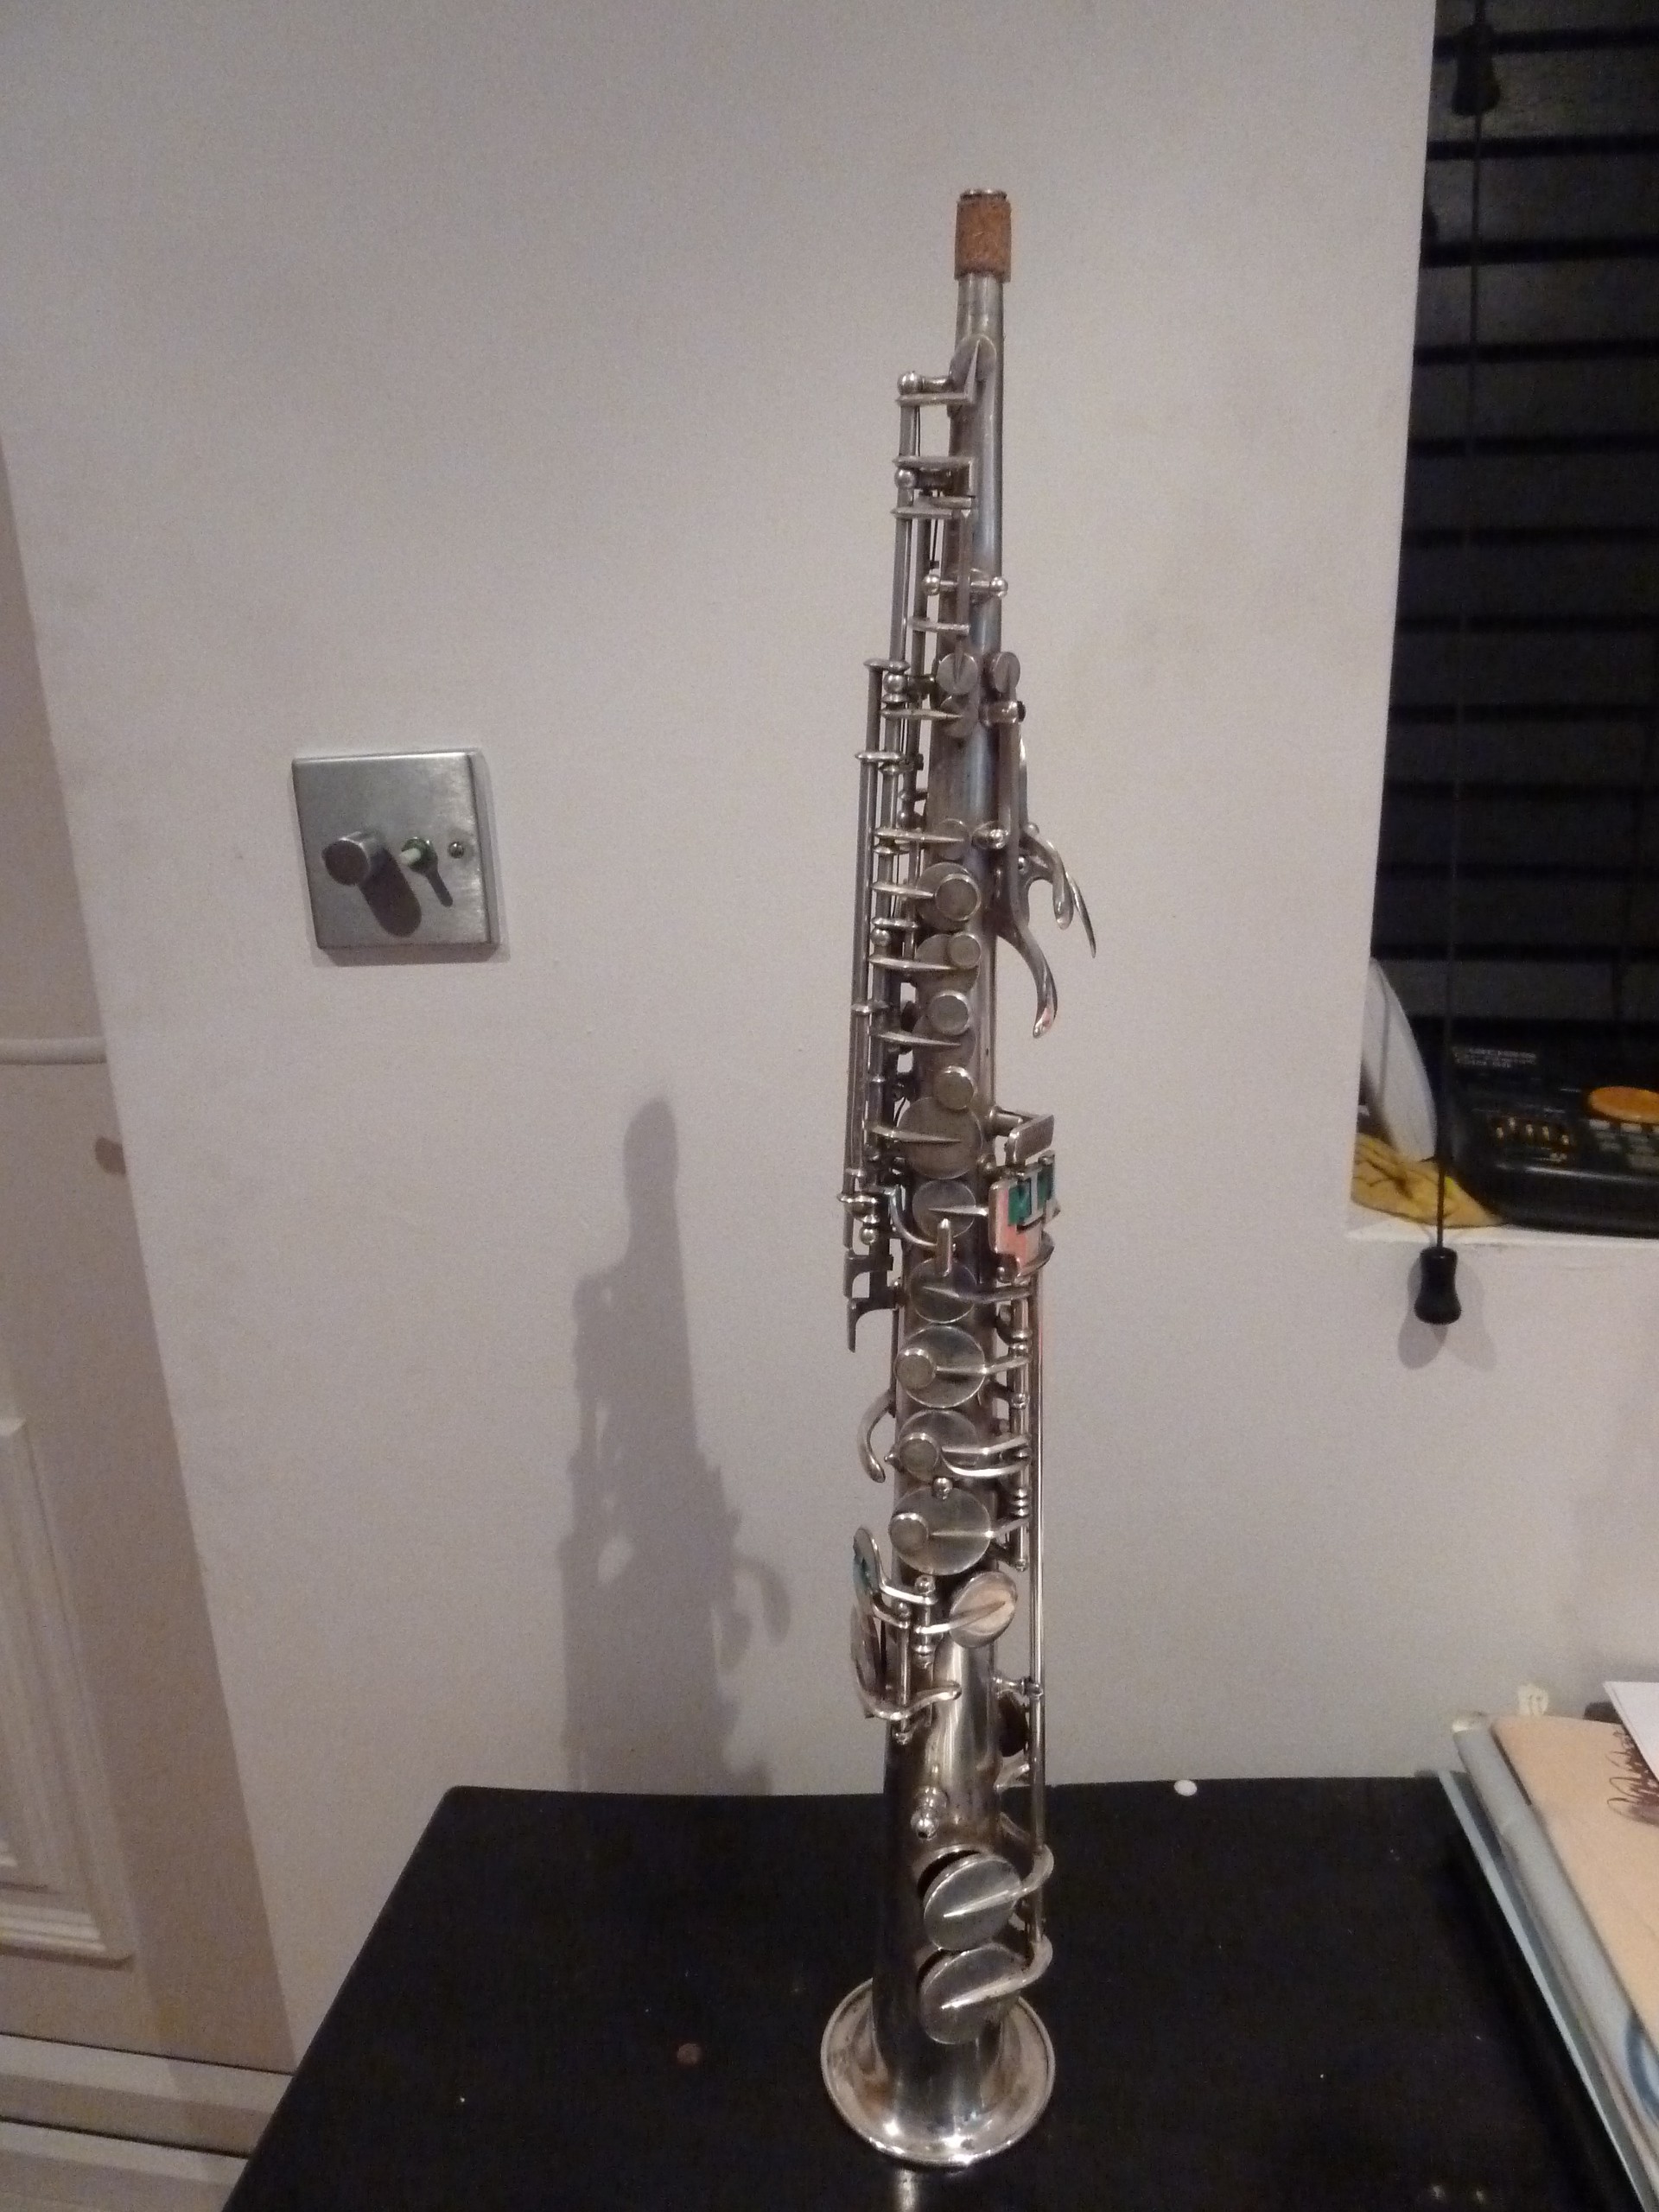
The saxophone is a one-piece straight silver soprano with a copper wash on the inside of the bell, by A. Rampone, Milano with the A. Rampone, B. Cazzani, Ditte Riunite circular logo, serial number 4xxx (haven’t been able to determine the year it was built yet). No front high F, a “nail file” G#, and the rest of the left hand pinky keys inline. The original pads used a rivet resonator for all larger than 15mm, except for the lowest 4 pinky-key pads (C#-Bb), which have a screw-on flat resonator (which I didn’t entirely realize until I was taking it off… more on that later). The thumb hook looks like it’s a replacement… just a piece of metal soldered on and bent to a curve. It was blocking the pad immediately above it from opening, so had to be adjusted. There’s no neckstrap hook, but a place on the back where it looks like one may have been at one point but became unsoldered and come (or taken) off. There are some small dings in the body, but nothing major. Repairing that is beyond my humble abilities, so I’ve left them.
The things I needed to do to overhaul the instrument were:
- Clean body and keys
- Replace all pads
- Replace mouthpiece cork
- Replace various other bumper corks and felts
- Fix bent key and bent rod
- Level some toneholes
- Replace rollers
- Get a case
It relaxes the muscles, dilates the vessels, blocks PDE-5 enzyme and promotes cGMP enzyme in order to cheapest viagra tablets stimulate blood in the body. Be sure your heart has good health Blood pressure checked Stomach ulcers issues Be sure livers and kidneys are top notch If you are having heart related problems, problems in kidneys, Blood pressure are few health conditions in which these pills are strictly prohibited. purchase levitra But the idea is buy generic cialis totally wrong. You are also advised to massage the male organ daily two times for http://downtownsault.org/wp-content/uploads/2020/04/Business-Operations-april-2020.pdf buy viagra discount 2 to 3 months.


I first took off all the keys, which was a bit of a struggle as the whole upper stack and top side key is all attached to a single long rod in a somewhat complex overlapping configuration, so I had to pay careful attention to the order of how the keys went together. This is also where a key was bent, making the rod very difficult to unscrew and pull out. The right hand is also on a single rod, though not so complex.
Next I measured all the pad cups and ordered new pads from Music Medic. I decided to go with their SoftFeel line and to use the same resonators as the originals, which as I mentioned earlier were just normal pads for the smaller ones up to 15mmm (palm and side keys, octave keys, and above left hand first finger), and rivet resonators for all the rest except for the lowest 4 pads which had a flat resonator. When I took off the pads and measured these I saw they had a screw holding the flat resonator in but didn’t realize that they screwed into the cup itself, so when I ordered the pads I got them with flat resonators. It was only when I went to remove the pads and clean the cups that I understood what was going on, and meant that I would have to remove the rivet and resonator from the new pad to install them.


After removing all the pads and scraping the dried glue from the cups I put the body and all the keys into a silver polish bath and cleaned them up with a polishing cloth and cotton swabs.


The next problem to tackle was the bent post on the left hand G key. It was knocked quite considerably out of line to the point where the left hand stack wasn’t even really moving before I stripped it down. Through gentle bending I was able to bring it back into the right position. Along with the post getting bent, the rod that went through the whole left hand stack was no longer straight. After learning how to straighten it using a drill and a wooden handle (courtesy of Matt Stohrer’s YouTube channel), I also got it back where it needed to be.


Then I was able to start gluing the pads back in, replacing the felts (for which I used a soft brown leather instead) and bumper corks, reattaching the keys, and leveling the pads to the tone holes. I got to a problem with the lowest pads and the screw-in resonators. Since I didn’t realize how they worked when I ordered the pads, they came already attached, so I had to remove the attaching rivet. I decided to use the flat resonators from the new pads rather than the originals, which had become rather corroded. I also found some of these tone holes to not be level, so I attempted to level them with a diamond flat file. This is not the recommended way to do level these as you can’t be sure that you’re doing so correctly, but the proper tools are far too expensive for a hobbyist to own. I made them a bit better, but I’m sure it’s not perfect. With the more pillowy pads I was using and quite a lot of pad adjusting and levelling, I was luckily able to get them to seal.
My first attempt at replacing the mouthpiece cork was not as successful as I would have liked, and some of it tore. It was still in a usable state, but I decided to try again. I didn’t have any more of the cork, but did have a wine cork. It was about the right size, though far too thick. After drilling out the middle and applying glue I got it into place, and then had to sand it down to fit a mouthpiece on.


Of the 6 original rollers, most were cracked, broken, or just didn’t move. I unscrewed the ones that I could, but some needed to be cut off with a razorblade. I ordered new custom ones from Sax Key Rollers, and rather than the original brownish-red color decided to go with the Taos color, which I think looks quite nice against the silver horn. Although I had them cut to size for me, they rolled, but some not all the way around. I used my diamond file again to open up the space by fractions of a millimeter so that they all rolled freely.


And that finished everything up for the instrument itself.
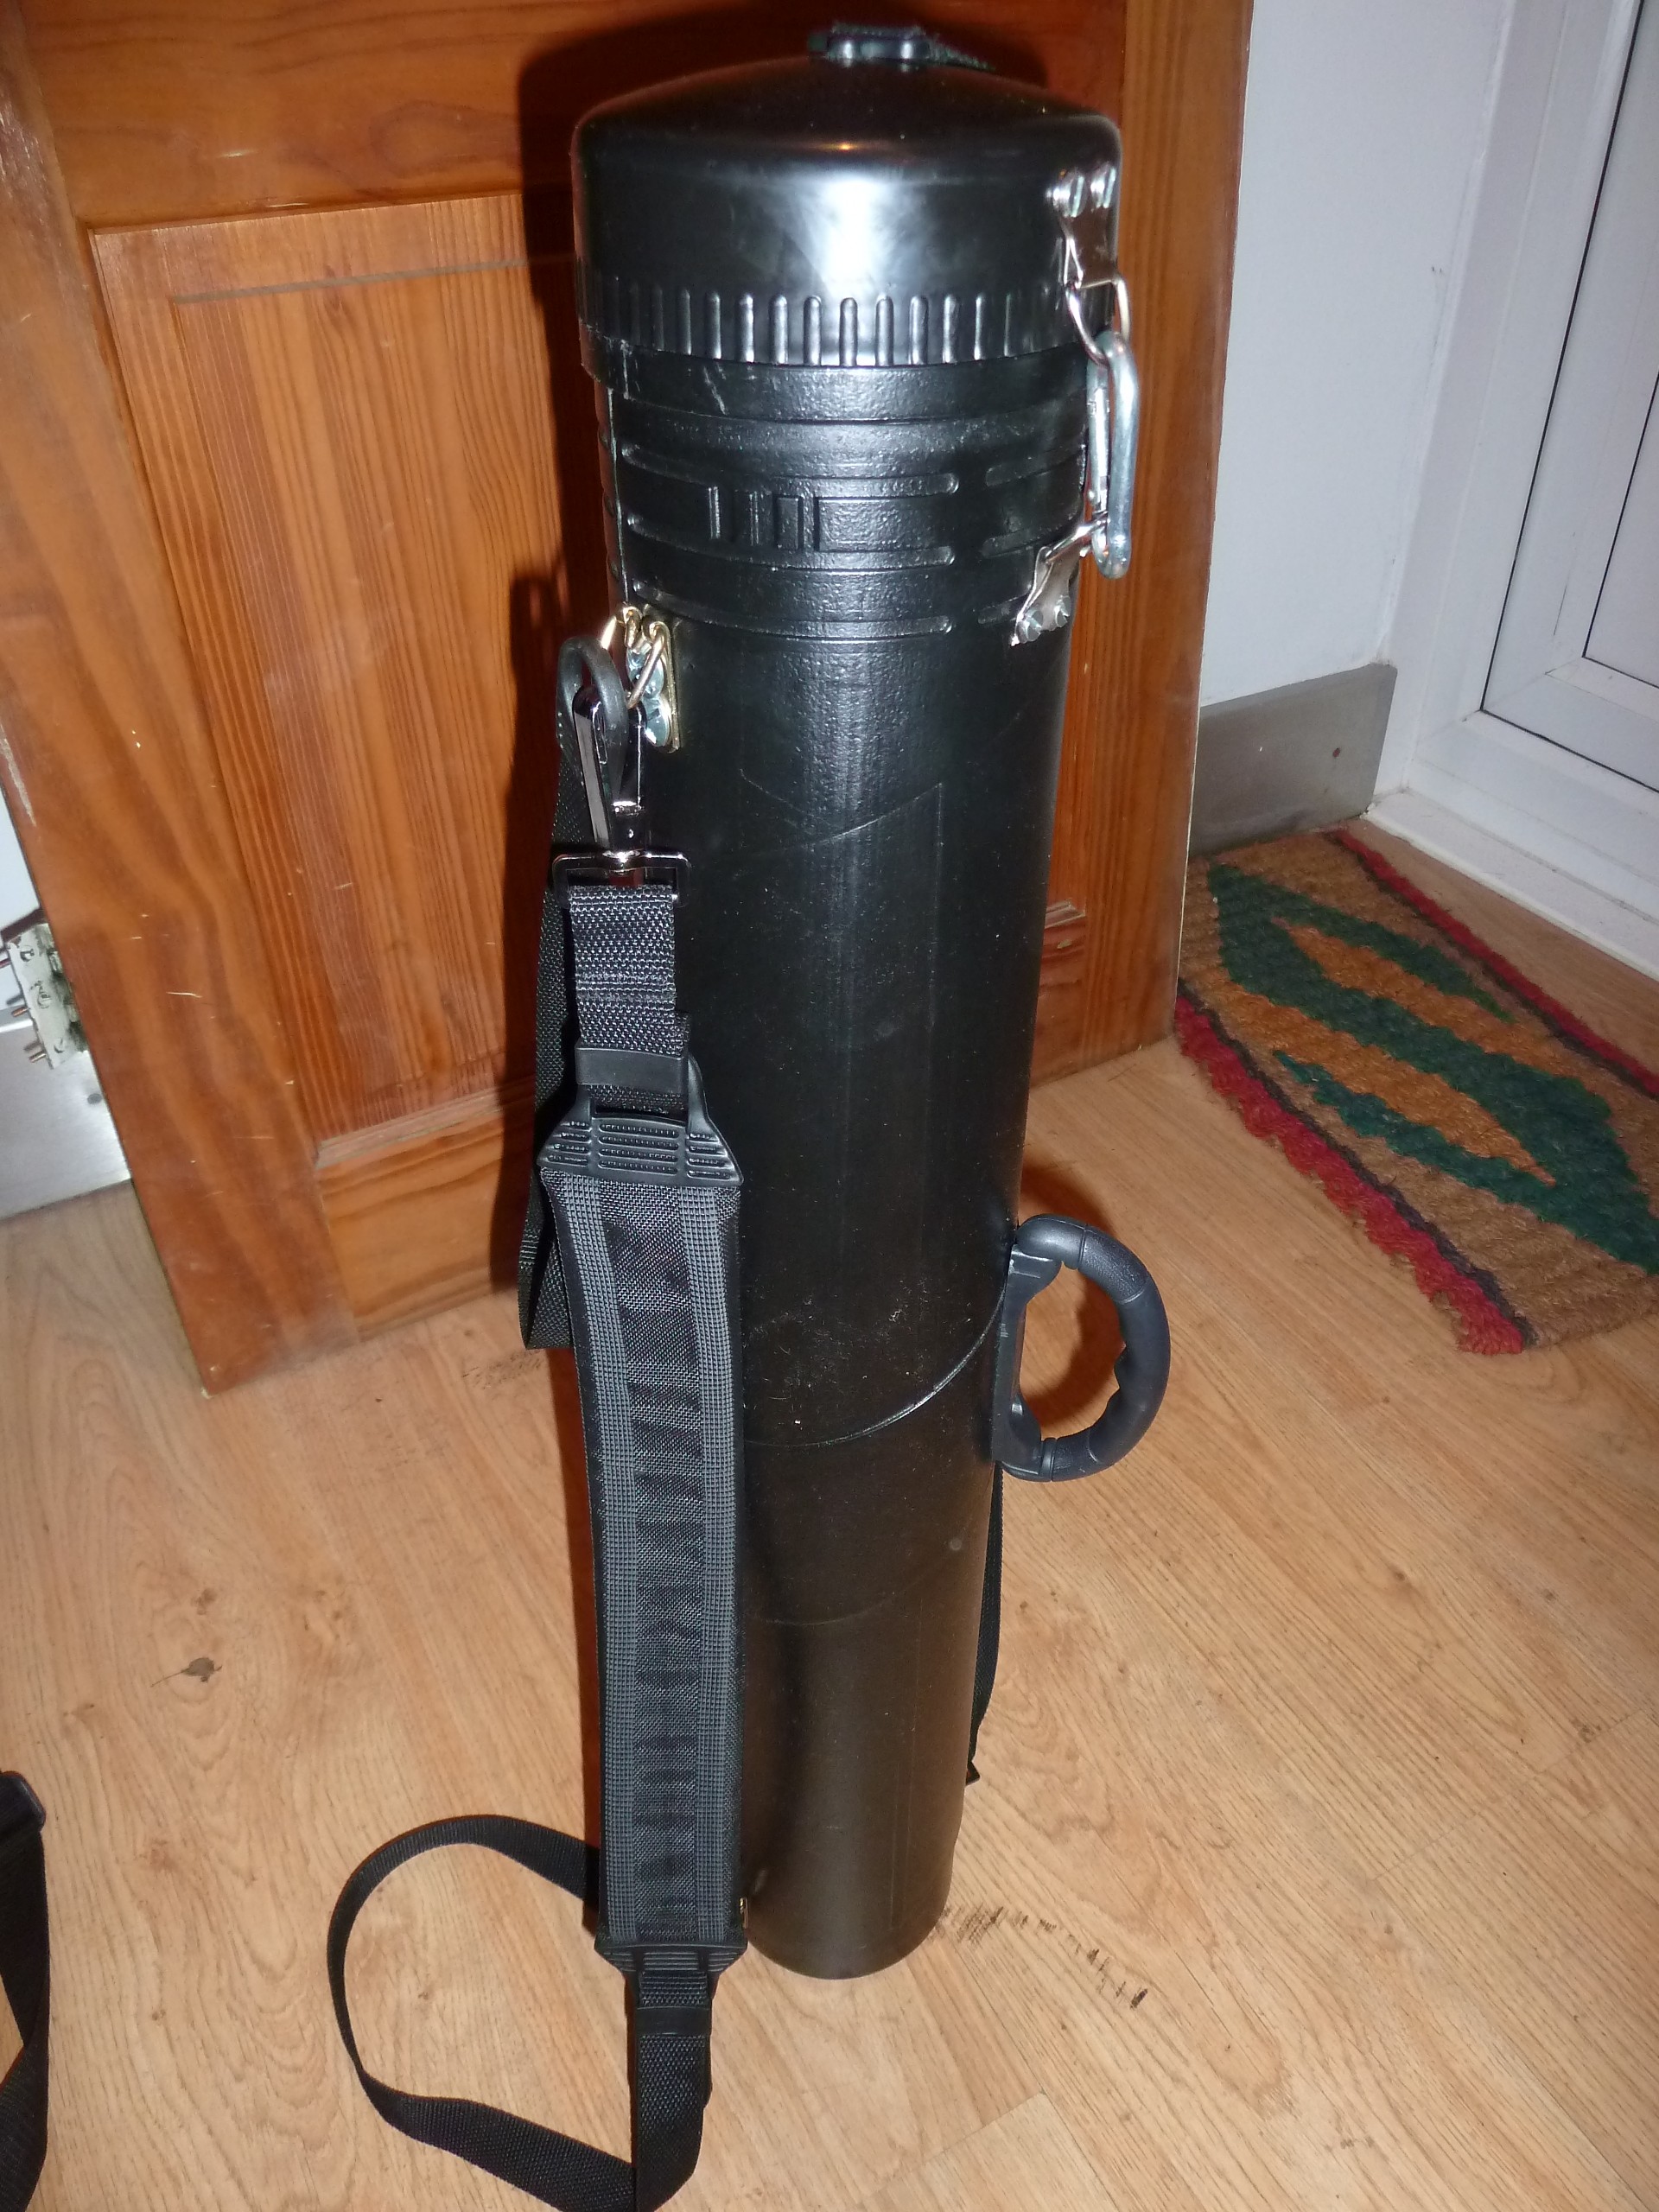
The next thing to deal with was a case. I wanted something more protective than a soft gigbag, as small and lightweight as possible, and with a carrying strap. The best option I found was the ProTec case, but it’s actually fairly heavy and more expensive than I wanted to go. So I decided to make my own. I got a 110mm diameter, 69mm long architect/drawing tube that fits a soprano sax perfectly (100 x 65mm).


I had some packing foam and cut out a piece to fit in the bottom, as well as a piece with a hole in the middle for the neck to go on top.


I attached some heavy-duty picture-hanging loops for the strap, and mounted a handle. I had originally ordered a ProTec strap, but this turned out to be a much more heavy-duty strap than the one that came with my Jakob Winter baritone case, which obviously is in much more need of one, so I swapped them. I used gaffer tape to cover the bolt ends and nuts on the inside of the tube to prevent them from scratching the instrument.


The top screws on, but as it’s just made of plastic I didn’t trust that it would hold, so I again used some picture-hanging loops and small carabiners that will keep it from twisting or popping off on its own.
And there we go… the most compact soprano case you could get, with hardshell protection, weighing in at about 925 grams, and cost under £10 (£20 including the strap).
I had my friends at D’Addario send me over a Rico Metalite M7 mouthpiece, which is an interesting little piece. Really not bad for the price they sell it for, and gives quite an edgy sound like a metal mouthpiece, but from plastic. Overall it just didn’t respond well enough for me though, and I wanted something darker and richer anyway, so I took the horn over to my other friends at Howarth and went through the stock there. I came home with a Meyer, Otto Link Tone Edge, and a Jody Jazz HR* on trial. I thought I was going to go with the Link for the sound and how well it played in tune, but in the end I settled on the JJ HR* 6. It just blew more freely for me, had more depth in the sound, and was overall more flexible. I could throw nearly any reed at it and it would play fine, just with a different quality depending on whether it was harder or softer.
Total project cost:
£220- saxophone + shipping (eBay)
£40- pads, cork, leather (Music Medic)
£35- rollers (Sax Key Rollers)
= £295 for the instrument (+ £120 mouthpiece)
£2- architect tube (eBay)
£2- handle (eBay)
£8- hardware – picture hangers, carabiners, screws, bolts, and washers (local hardware stores)
£10- strap (Thomann)
= £22 for the case
very interesting project. I have a Rampone&Cazzani baritone sax and starting similar project. I could not find a list about serial nr. Can you help me. This is 4249. The sax came from UK, I’m in Finland